I love a good sale, especially when it comes to saving money on my favorite food items. I also like to have a really well stocked pantry. Combine the two and you have a recipe for a disaster, which is exactly what our pantry was.
This post contains affiliate links. For more info, see my disclosures here. We are a participant in the Amazon Services LLC Associates Program, an affiliate advertising program designed to provide a means for us to earn fees by linking to Amazon.com and affiliated sites.

It seems I had a hard time saying no to a good deal, even when I had no place to put it.

7 Steps to an Organized Pantry
Something needed to be done.
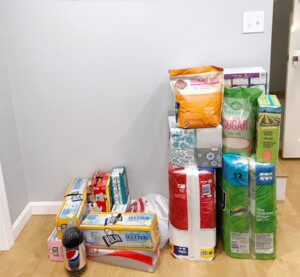
Nick and I took about two hours one weekend to reorganize. We started with emptying the pantry. There were some items that really could go elsewhere (extra soap, ziploc bags, vitamins, etc.). We set those off to the side. There were also some items that were expired and needed to be thrown out. Next, I organized the remaining items by category. (I placed all cereals together, all crackers together, etc.)
Once the items were organized by category, Nick and I set up a Kanban system. Kanban is a replacement system (more about that in a future post). We then put items that were used less often in the more difficult to reach places, like the top shelf and corners of the pantry. Frequently used items were placed front and center for easy access.
For some smaller items, such as individual packets of crackers or granola bars, I prefer to use shoebox sized containers. The packages they come in tend to take up a lot of space. When using this system, it is important to rotate through items so that everything is used by the expiration date.
Containers we use – 12 boxes set Sterilite 6 Quart Storage Tote Shoe Box Containers Clear Closet Tub
After each item was placed appropriately in the pantry, I made sure that there was enough space for each item when the pantry is fully stocked. Knowing what I planned to add to the pantry was essential in this step! It is also a good idea to leave room for expansion, miscellaneous goods and seasonal items.
I also moved some items around. This is important! You only want to start labeling once you’re happy with your set up.
Related Post: Easy Toy Organization System Kids Can Use
Maintaining an Organized Pantry
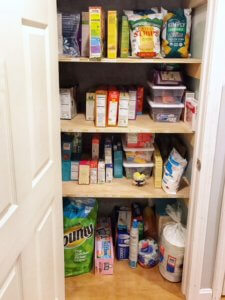
When everything was in its final place I began labeling the shelf under each item. This helps me to remember where everything goes. It also makes it very easy for anyone to find what they are looking for! That certainly comes in handy with four young children.
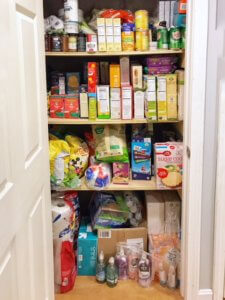
You’ll notice some empty spaces when you look at our ‘after’ picture. Those are spaces I am saving for items that I know I will be putting into the pantry in the future. Even though it was crammed with items in the before picture, there were some things missing that are normally in there! Leaving those spaces and having some space for miscellaneous items ensures that our pantry will stay organized.

Review after a few weeks to ensure the new organization system works for everyone. It is always OK to make it better!
Pantry Organization Recap
- Empty the pantry.
- Sort items into three categories: staying in the pantry, finding a home elsewhere in your house or being discarded (either through donation or being thrown away).
- Organize items staying in the pantry by category.
- Place frequently used items in easily reached spots. Place rarely used items in corners or on the top shelf.
- Move items around until you are happy with the placement of everything.
- Label!
- Review. Update if necessary.
What are your tips for an organized pantry?

Great tips, thanks! I recently moved so everything is pretty okay, but there is definitely room for improvement.
Thank you Nina. Congratulations on your move!
Yes! Thank you for the maintenance tips! I can’t tell you how many times I have organized our pantry, just to have it be such a mess in a few months time. Brilliant ideas!
Thank you Molly. I will also be sharing our Kanban system in the next couple of weeks. We use it to ensure that we always have the staples we need!
I’m glad I read this post because I’m actually reorganizing my kitchen this weekend! I’ve been gathering some tips and these are definitely helpful. I am going to label EVERYTHING!
Labeling everything is quite helpful, especially when there are multiple people using an area. Then everyone knows where to put things when they are done!!
Great tips! Our pantry looks like a train wreck right now… I think I know what I’m doing tomorrow now that I’ve read this!
Good luck Gabby! I’m sure it will turn out great!!!
Great tips! I love me a clean pantry!
Thank you Renee!
Been meaning to reorganize my pantry – great step-by-step process here! Now I know what I’m doing this weekend lol
I’m glad to help Felicia! You’ll be so relieved when it’s done!
I have a tiny pantry and it has gotten out of control! Thanks so much for these tips!
Heather, I’m glad they were useful!
If only my kitchen were large enough to have a pantry! One day I hope. I do however have one large lower cabinet that seems to be the catch all for everything that won’t fit in other cupboards. I tend to just throw things in and shut the door quickly! Haha, I’ll need to implement some of your organization tips!
Laura, we also have a small kitchen and I always wanted a pantry. When we finished part of our basement we also added a closet at the bottom of the stairs. That became my pantry! I hope the tips help you with your large cabinet!!!
It always feels so good to have a freshly organized pantry. Thanks for the tips!
I agree Emily!
Good tips! My family tends to take certain things out of their boxes too because it’s hard to store in the box, but it’s so much easier when it’s just the individual items.
-Lauren
Lauren, I find that putting them into a different (see through) container is quite helpful!